In general for Linux it’s better to install ImageJ directly instead ofapt install imagej.
This method also works for Raspberry Pi and other ARM systems.
Install Java Runtime Environment (also works with openjdk-jre)
apt install default-jre
Download
latest platform independent ImageJ
Unzip to ~/ImageJ recursively
unzip ij*.zip -d ~
Add to ~/.bash_aliases
aliasimagej="$HOME/ImageJ/ImageJ"
Close and reopen Terminal, then start ImageJ by:
imagej
Create Imagej icon by creating file ~/.local/share/applications/imagej.desktop with contents:
The CreativeLabs Soundblaster Roar 2 speaker used with Linux and Android devices is recommended.
Soundblaster Roar 2 FCC ID is IBAMF8190.
The Roar 2 allows simultaneous Bluetooth pairing with two devices while getting analog audio from a third device, and will automatically switch playback audio from one to the other if you push pause on one and play on the other device.
Streaming music from one device (say your laptop) and get a phone call on the other device (your smartphone), the SB Roar 2 switches instantly to the phone to ring on the SB Roar 2 speaker.
This is an essential feature feature vs. forcing disconnection and connection manually like as with inexpensive peripherals (headphones, speakers).
SoundBlaster Roar 2 battery life is excellent.
Even leaving it on unused for a day, the low-power mode preserves most of the battery life.
It can go a couple weeks between charges.
Roar 2
NFC pairing enables instant pairing without going through phone menus.
Even $40 Bluetooth speakers have NFC pairing now.
NFC Tap-to-pair is an essential Bluetooth speaker convenience feature.
The SB Roar 2 does not to go into pairing mode when not connected.
This is good because devices that auto-pair could enable an unauthorized connection to a Bluetooth speaker in two-way headset mode and eavesdrop.
The SB Roar 2 mitigates this risk by requiring a button press to go into Bluetooth pairing mode.
It’s also straightforward to Bluetooth pair via NFC.
The SB Roar 2 can only receive phone calls.
It cannot initiate calls from the SB Roar 2.
I find the audio performance to be very good on phone calls.
No, it’s not of the quality of a Polycom conference phone, but for single users, the microphone location just left of bottom center of the speaker face seems very adequate for single user conference calls.
SB Roar 2 does NOT go into headset mode when using voice prompts on a connected device – so “OK Google” from Android Wear or your smartphone use the microphones on those devices and NOT the SB Roar 2.
This is an excellent design decision.
The audio playback A2DP does mute of course since your device pauses playback.
Disable voice prompts by tapping (quickly press) “-” and multifunction key at the same time.
This is very useful for comparing audio between normal/Terabass/Roar modes.
Enable Voice Prompts by quickly tapping “+” and multifunction key at the same time.
Bluetooth devices (legacy Bluetooth, not BLE) use FHSS (frequency hopping spread spectrum) techniques for maximum reuse of the busy 2.4 GHz band.
This means even devices with outstanding antenna systems like the SB Roar 2 can have maximum range severely limited in dense urban areas or elsewhere were 2.4 GHz usage is very high.
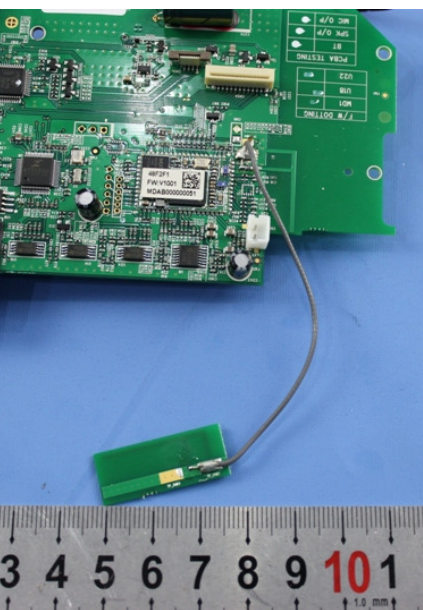
The dual PIFA antennas of the SB Roar 2 allow for polarization/anti-nulling diversity for greatly
improved robustness for audio streaming applications.
The PIFA antenna gain is just under 6 dBi specified, and the transmitter conducted output is about 0 dBm, so the Roar 2 EIRP is just under +6 dBm, or 4 mW.
I measured maximum range as rock-solid to 25 meters line-of-sight, including
phone blocked by body before stopping test.
I believe 50+ meters may well be possible in low interference line-of-sight conditions.
By comparison, a
$2 Bluetooth speaker
got about 12 meters range, and a $40 Bluetooth speaker got about 18 meters maximum range under the same test conditions.
This test was done under about -70 dBm maximum interference level from numerous Wifi routers in the area.
I first attempted the test near a large apartment complex where the Wifi interference level was -60 to -50 dBm from 100+ Wifi APs.
Under those conditions, the maximum range for all three speakers ($2, $40, and Roar 2) was about 12 meters.
If the source audio device Bluetooth doesn’t have aptX code, there are USB aptX hardware transmitters that present themselves as sound cards.
Confirm the A2DP codec on Linux by powering off the Bluetooth speaker, start Bluetooth sniffer:
hcidump avdtp
Then power-on speaker and connect over Bluetooth from your Linux PC.
The output includes:
AVDTP(s): Capabilities rsp: transaction 5 nsp 0x00
Media Transport
Media Codec - non-A2DP (aptX)
44.1kHz 48kHz
The Roar 2 has aptX.
Similar text is given for AAC and SBC, then finally the SBC codec is chosen:
Terabass reasonably boosts low frequency content.
It’s good for volume at all levels, especially low volume.
Roar mode is audio compression and brightening for high volume listening.
It alters audio characteristics.
For high fidelity listening, leave Roar Mode off.
Roar Mode is about blasting sound, cranking it to 11.
As per the
Roar 2 user manual,
maximum loudness in “roar” mode is achieved with the speaker externally powered, and I can confirm there is a tangible improvement in loudness being plugged in.
I noticed that I could visibly see the side drivers moving down to 2.8 Hz with “roar” mode enabled and at full volume, though the motion was slight so many 10’s of dB down.
The low frequency rolloff seems to steepen below about 58 Hz or so.
This was done using an Android frequency generator over Bluetooth A2DP; if someone is really interested I could do a hard-wired test with a lab signal generator.
The sound is much more pleasant that that built into most flat screen TVs or sub-$100 bluetooth speakers overall, more than enough for a city backyard gathering of a small group of friends.
You would have to get one of those $300 Bluetooth giant party speakers to get a worthwhile upgrade in volume for parties.
Online reviewers have commented that the MegaStereo OMTP cable does NOT work with Roar 2.
It is 4 rings on one end and 3 rings on the other, requiring audio output from the Roar, but the Roar 2 is said to NOT have this so you apparently cannot link two Roar 2 together.
The $10 CreativeLabs mesh case is good to carry the Roar 2.
By design it is not waterproof at all nor does it afford much drop protection, as it is meant to give a shoulder strap with transparent audio characteristics.
It feels sufficiently light to carry this way, although many might put it inside a backpack.
There is a $20 silicone case available from CreativeLabs for more shock protection.
If Ubuntu gives popup messages about auto-adding “new” printers upon connecting to a wired or WiFi network, try the configuration below.
Stop auto-add printer on network connect by editing /etc/cups/cups-browsed.conf:
BrowseRemoteProtocols none
Then restart CUPS from Terminal:
service cups restart
Test: reboot PC with network disconnected, check that the offending printers are not in Settings → Printers, and then connect to the network and verify that the printers don’t auto-add again.
Like other Brother printers we’ve used, the HL-3170CDW works great from Linux.
With Ubuntu, the Gutenprint USB driver automatically came up and worked fine.
The OEM driver below is optional.
Download
linux-brprinter-installer script
from “Driver Install Tool”.
Plug in HL-3170 via USB. Don’t skip the mkdir step or the installer will hang!
You may wonder why Linux shows less than full “signal bars” for Wifi, even for a device relatively close to the Wifi AP (Access Point, the “router”).
The answer is that the Linux desktop GUI is being honest about the quality of the connection, which is immediately relevant to the data throughput and connection latency.
The end user shouldn’t care as much about raw RF signal strength (e.g. -70 dBm) as they should about the quality (SNR) of that connection.
Of course, low signal strength < -80 dBm also causes low SNR and hence decreased link quality, even in relatively clear Wifi signal environments.
Unfortunately, many OEMs (and tech websites on click-commission) have duped people into buying expensive individual APs instead of quality APs such as from Ubiquiti that can be distributed evenly throughout the home or office.
You actually typically want to lower transmit power from the default level to around +18..+21 dBm to help the user devices roam between APs for best performance, and to disconnect promptly as a user moves off-premises.
In a particular client site with suboptimally configured Wifi network, the GNOME desktop environment (and also in Unity desktop) 2 out of 3 signal bars for WiFi, despite being connected at MCS index 15 to an 802.11n AP on 5 GHz with a signal strength approaching -50 dBm.
MCS 15 is the fastest possible connection for 802.11n, so why does GNOME/Unity show only moderate “signal bars”?
This is because there are very many other high utilization APs on the same channel so that SNR (“link quality” for many Wifi cards in iwconfig) is low (less than say 0.7 normalized).
Home and business Wifi users will virtually always get better performance from:
multiple low-power APs instead of single high-power AP
5 GHz instead of 2.4 GHz
APs set to the clearest possible Wifi channels (such as DFS)
APs placed as much as possible to interior of environment, high on wall or ceiling
iterative tuning of the system to minimize co-channel high utilization APs
The goal is for the AP to not “hear” other off-premises Wifi or other on-channel wireless activity, since generally the AP due to siting and high performance chipset “hears” significantly better than the end user devices.
Some Windows-oriented computers like Microsoft Surface with “Connected Standby” or “Modern Standby” may not be well supported in Suspend / Sleep with Linux yet.
Consider having such a system lock on lid close until the Linux kernel is updated to support these newer power states.
For better security in general, shut the laptop down while in transit in case of loss or theft.
Locking screen with screen turned off gives sufficient power savings for short walks.
Force Linux lock on lid close with a systemd-based Linux distro such as Ubuntu by editing “/etc/systemd/logind.conf”, uncommenting line:
HandleLidSwitch=lock
Reboot the computer and verify lock behavior on lid close.
Reference:
Microsoft
description
of traditional S3 standby vs. connected standby vs. modern standby
Lock on lid close may not work when the laptop is physically docked, but does generally work when the laptop is out of dock. Do the manual lock if this doesn’t work when physically docked.
Intel Distribution for Python utilizes the conda package manager, set to the “intel” channel.
Pros: Intel Python uses highly accelerated math library versions of popular packages like Numpy, Scikit-learn, etc. reside.
Cons: Intel Python is slow to update to new library versions.
Anaconda updates within a couple days, but Intel might take weeks or months to update the libraries.
Note that standard Anaconda Python already gives MKL performance in some libraries like Numpy and Scipy.
We generally use the regular Anaconda instead of Intel Python to get updated libraries with most of them having MKL.
The convex hull is frequently used to process a pixel region.
To find the indices of the outer edge of the convex hull may be accomplished using the distance transform.
I do not claim this to be the most efficient method.
This algorithm gives similar results to Matlab boundarymask().
By definition, the distance transform of all region edge pixels to the background is identically one.
The chamfer distance transform is suitable for smooth regional boundaries, and has significant speed advantages over more brute force approaches that may be more generally applicable for non-smooth boundaries.
Use either masked image arrays or use NaN as a
sentinel value in 2-D array mask.
SciPy ≥ 0.17 is assumed.
It’s a good idea to breakup project code into distinct subdirectories.
It can be useful to have a CMakeLists.txt for each of these directories that are included from the top-level CMakeLists.txt.
Assume a C project with subdirectory io/ and top-level CMakeLists.txt:
Build a little test script in io/ directory to test just HDF5 I/O,
and compile the whole program from the top level directory, then test the main program and subdirectory libraries:
ctest --test-dir build -V
CMake Directory variables: to refer to the parent project directory use ${PROJECT_SOURCE_DIR}.
If using nested projects, ${CMAKE_SOURCE_DIR} refers to the highest level CMakeLists.txt directory
Edit all CMakeLists.txt recursively: on Linux / Unix systems, edit all CMakeLists.txt in a project with a command like